 Swirled and Spooky! Ever had “recipe fatigue”? Not sure? What is “recipe fatigue”, you ask? Don’t worry, I totally just made it up. But I swear it should be a real thing! All of you home chefs and bakers out there, how many times have you spent hours upon hours, pouring over recipe site after recipes site, searching for one that matches the style, taste, time frame and billion other factors you are looking for? How many times have you thrown your hands up in frustration and just picked something that really wasn’t what you wanted? No? Just me? Well, I find this happening to me quite frequently. Usually, I am looking for a recipe for a specific occasion, and I have an idea in mind of how I want the presentation to look, but there are a million logistical criteria that must also be fulfilled, such as how long it takes to make, how many ingredients are necessary, does it have to be served hot or cold, does the occasion require an item that can be served individually or can everyone take from a single dish,…. You get the point. There is a lot of planning going into choosing the right recipe. This is where I have begun experimenting with what I refer to as “recipe mashing” (I’m creating a whole new dictionary here apparently). Basically, I find a recipe that comes out looking the way I want, a recipe with the skeleton of a recipe that will get me there, and then take bits and pieces of advice and adaptation ideas from hundreds of other reader comments and food blogs to finally arrive at a recipe that is a whole new beast and exactly what I have envisioned. So all of that long introduction was to say, today I present to you a “recipe mash” perfect for Halloween. It’s a simple recipe with a short list of ingredients and a low hands-on time requirement. Being able to make this one ahead of time and the built-in single serve portions make it a simple solution for a party, whether you are hosting or you need an easy to transport festive dessert to take along to another’s. For equipment, you need two standard 12 cup muffin pans, some mixing bowls, spoons, measuring cups/spoons, a mixer and a food processor (unless you want to crush Oreos by hand).  Cupcake tins: lined, sprayed and ready to go Ingredients:
Instructions: Crust:
 Oreo crusts: baked and ready to go Cheesecake filling:
8. Take your first color, snip the end of the bag, and fill 1/3 of each, now cooled, muffin cup until all cups have a portion of that color. 9. Repeat with the next two colors until each cup has 1/3 of the bottom filled with each color and they are filled to about half way to the top. 10. Taking a toothpick, go back through each cup and swirl the colors together in circles. Be careful to not swirl too much, or you will end up with a muddy brown if they food colors are combined too thoroughly.
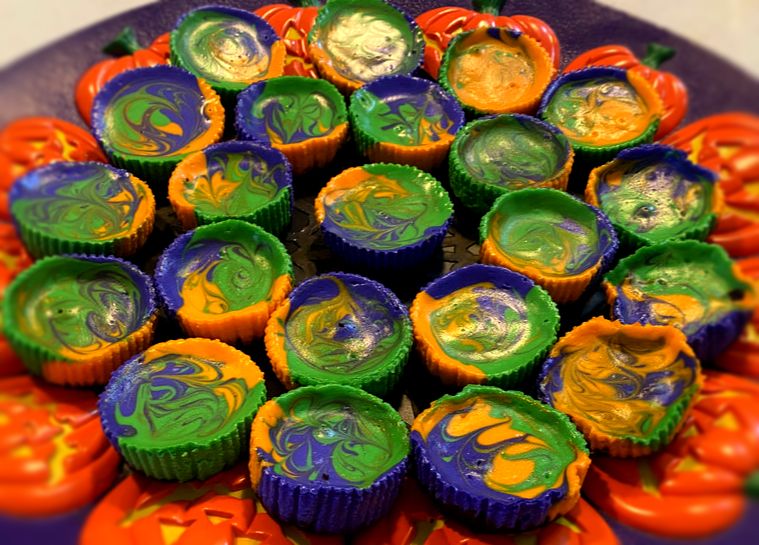
11. Place muffin tins in 350 F preheated oven for 15-16 minutes. When you remove them the center should move only slightly when moving the pan, and they should no longer be shiny. 12. Allow cheesecakes to cool in pan on counter for 30 minutes, then place in refrigerator for at least 2-3 hours, preferably overnight. 13. Before serving, place cheesecakes in freezer for half an hour. 14. Right before serving, remove cheesecakes from freezer and gently peel off cupcake liners. Plate cheesecakes and enjoy! 15. Leftovers should be returned to the refrigerator with an hour or two of being out and can remain in the refrigerator for up to three days after being baked  Fresh out of the oven  Looking Spooky!
0 Comments
Leave a Reply. |
AuthorDoctor by day, baker by night! When I'm not at my doctoring day job, I love to be in the kitchen with my family baking, cooking, decorating and, most importantly, eating ice cream. Archives
November 2021
|


 RSS Feed
